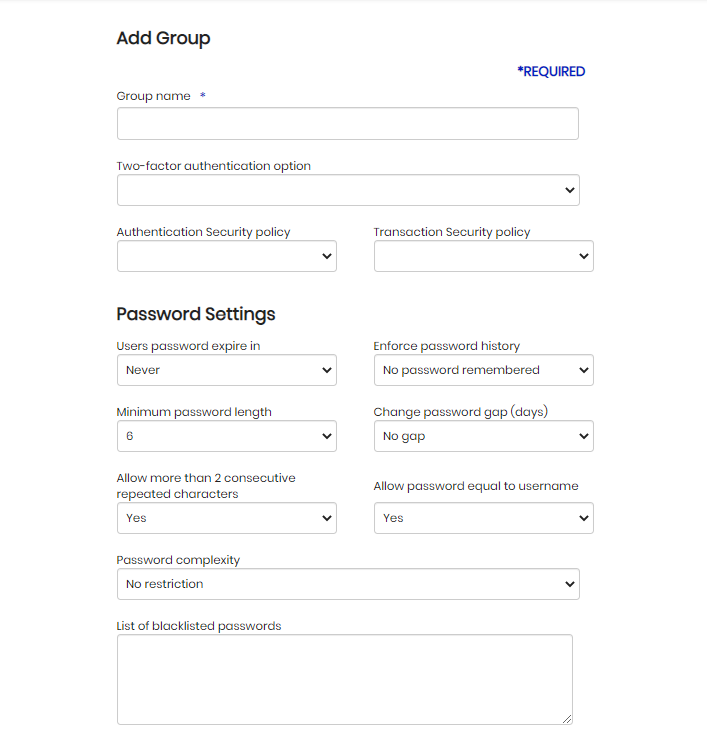
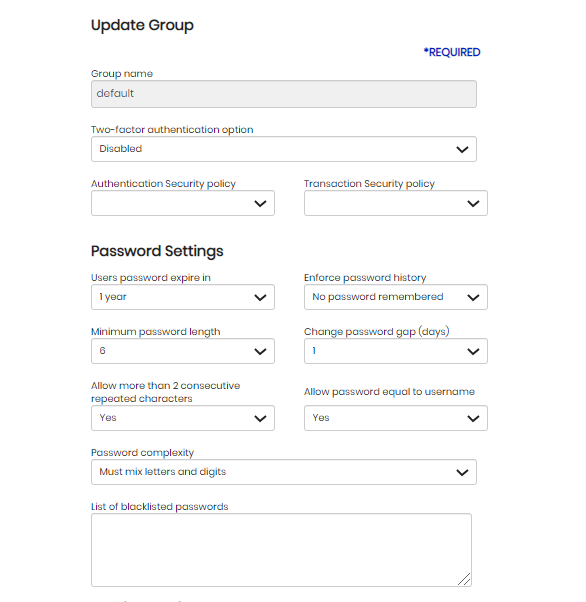
Group Management

This module allows you to manage the groups. Each group will contain a set of security and settings.

Add Group

1. Click Groups → Add Group

Figure 1(a): Group List page

Figure 1(b): Add Group page

Figure 1(c): Add Group page

Figure 1(d): Add Group page

2. Group details can be divided into 4 sections, which are:

  • Password Settings. It contains all the password policy. Details description as below:
NoParameterDescription
1Users password expire inIt specified when the user password will expire. Once the password expired, user is required to change his password before he can proceed to other functions.
2Enforce password historyWhen enabled, it does not allow user to re-use back the system remembered password.
3Minimum password lengthThe minimum password length.
4Change password gapThe gap, in day, enforce the day needed in between the password change. Example, if change password gap is 2, then every user belong to this group will not be able to change their password for the next 2 days after they change their password.
5Allow more than 2 consecutive repeated charactersA Yes/No solution to allow or denied password setup with “password” or “pasword” without consecutive repeated characters.
6Allow password equal to usernameA Yes/No solution to allow or denied the username and password is similar or not. Eg. Allow version: Username: centagate Password: centagate Denied permission version: Username: centagate Password: centagate1234
7Password complexityEnforce the password complexity, which could be combination or digit, character and symbol.
8List of blacklisted passwordsYou can enter list of passwords that are not allowed to use even though it complies with the password policy. This list of passwords normally is the passwords that are easy to guess.

Table 1: List of Password Settings Table

  • Session Settings. It contains all the session management. Details of the description is as below:
NoParameterDescription
1Allowed login attemptsHow many invalid login allowed before CENTAGATE locks the user
2Lock effective periodDefines how long a user will stay locked. If the lock period is over, then user will be automatically unlocked whenever he performs log in.
3Session timeoutHow long a user can stay idle before CENTAGATE logs the user out.
4Dormant periodIf a user did not login within the defined dormant period, the user status will be change to “Dormant”. A dormant user will not be able to login into CENTAGATE
5Maximum number of users per sessionA validation to validate and verify the session. Once the session is more than the set value, session will redirect to a warning message for user to understand the issues and force to logout the oldest session in the moment. Request user to re-login again to continue their work.

Table 2: List of Password Settings Table

  • Question Answer Settings. It contains all the question answer management. Details of the description as below:
NoParameterDescription
1Number of questions to setNumber of questions that the user needs to set
2Number of questions to answerNumber of questions that the user needs to answer once login

Table 3: List of Password Settings Table

  • Authentication Options. It contains AD Proxy authentication and a list of 2FA authentication methods that the group can be applied. You must select at least one 2FA authentication method.
NoParameterDescription
1PKIUsers can sign in using the correct certificate installed either in their browser or PKI token.
2OTPOne-time password generated by a valid OTP device or software. This one-time password will be used for authentication.
3SMS OTPAnother form of one-time password generated by a valid OTP device or software. User requests OTP and OTP will be sent to the user's mobile via SMS. This one-time password will be used for authentication.
4CR OTPA device that will generate an “one-time password” based on challenge. This one-time password will be used for authentication.
5Mobile CertA mobile PKI solution that works with mobile browser to achieve an out of band PKI authentication.
6Mobile Audio PassA mobile PKI solution that works with Audio Pass to achieve an out of band PKI authentication.
7FIDOA very secure PKI solution using a small special-purpose device that can talk directly to the relying party.
8QR CodeQR Code. A generated code that will be scanned by the CENTAGATE mobile application to complete the authentication process.
9Question AnswerQuestion Answer. One or more questions will be asked to the users to make sure his identity.
10Push NotificationPush Notification. User will verify their identity by responding to a push notification that is sent to the mobile device.

Table 4: List of Password Settings Table

3. Group name must be unique.

4. Security policy is optional. Whenever selected, you will also need to configure the Trust level of the users under this group. The trust level itself consists of low trust, medium trust, and high trust.

Figure 2: Security Policy 

6. There are three options for Trust level of users in the CENTAGATE Cloud system.

  • Low trust. All users that belong to this group are required to achieve minimum low trust level score in order to be authenticated without step-up authentication.

  • Medium trust. All users that belong to this group are required to achieve minimum of medium trust level score in order to be authenticated without step-up authentication.

  • High trust. All users that belong to this group are required to achieve minimum of high trust level score in order to be authenticated without step-up authentication.

Figure 3: Trust Level

7. Whenever one option in the drop-down list Security policy is selected, you will also need to configure the Step-up authentication of the users under that group.

8. There are three options for Step-up authentication in the CENTAGATE system.

  • Apply. All users that belong to this group always must be go through a step-up authentication (authenticated by other types of authentication) if the CENTAGATE system detects user’s trust score is not meet with the minimum required trust level score.
  • Notification only. Users that belong to this group will be notified if the CENTAGATE system detects user’s trust score is not meet with the minimum required trust level score.
  • Block and Display message. Users that belong to this group will be notified and blocked from continue authenticate if the CENTAGATE system detects user’s trust score is not meet with the minimum required trust level score.

Figure 4: Step-up authentication option

Update Group

1. From the group list, click on the Update link to the right of the group you want to update.

Figure 5: Group List

2. Group name is not allowed to be changed. The changes will only take effect after user re-login into CENTAGATE Cloud.

Figure 6(a): Update Group page

Figure 6(b): Update Group page

Figure 6(c): Update Group page

Figure 6(d): Update Group page

Delete Group

1. From the group list, click on the Update link to the right of the group you want to delete.

Figure 7: Group List

2. Click on the Delete button at the bottom.

Figure 8: Update Group page

3. You can only delete groups that have no user under it.

4. The Delete button will be hidden if the group is the default group.

Figure 9: Update Default Group page